
Knurling is an often-overlooked feature of a part, but it can have a huge impact on how the part looks, feels, and functions. We’ve been adding knurls to parts across a range of industries, and we’ve seen firsthand how a simple knurl can transform how well a tool works.
In this guide, our manufacturing experts will explain what knurling is, how it works, design considerations, and when you might add knurling to a part.
What Is Knurling?
Knurling is a manufacturing process that entails cutting a texture onto the surface of a part. The texture is typically patterned and repeated across the part, or along a certain section. In our shop, knurling cylindrical parts is way more common than flat parts, though we can realistically add a knurl to almost any geometry.
Once we’re done fabricating a part, we can use specialized tooling to cut in straight, angled, or intersecting ridges, otherwise known as adding a knurl to the part.
If you’ve used a thumb screw, a ratcheting wrench, or some kind of adjustment knob, you’ve probably encountered a knurled part already. This added feature gives you more grip and control over a tool or piece of hardware, allows parts to press-fit more reliably, and adds a decorative element to a part.
Interestingly, knurling started back in the day of blacksmithing. Then it became more prevalent during the Industrial Revolution as it became more standardized and easier to add. Later, precision applications like Swiss watchmakers pushed the technology and ultimately landed on a knurling process that can be controlled and applied to various parts today in modern machining.
How Knurling Works
The basic knurling process is pretty straightforward. We would use a specialized knurling tool that either presses into or cuts into the surface of the workpiece and cuts material away, then the process is repeated until the pattern is finished.
Most manufacturers who offer knurling either offer forming or cutting options. Form knurling uses pressure to displace material rather than removing it, through hardened wheels that press into the surface of your part, which creates valleys and peaks.
The other option is cut knurling, where material is removed to create the pattern through a strong blade and specific machine programming.
It’s worth mentioning that knurling is different from engraving. Engraving typically uses a cutting tool to create lines, letters, or graphics, while knurling uses specialized tooling to repeatedly create a consistent geometry over a surface.
Types of Knurling Patterns
In most shops, there are three knurling patterns to choose between: straight, diagonal, and diamond.
Straight knurling
Straight knurling involves creating parallel ridges along the surface. For cylindrical parts, the ridges are usually parallel to the central axis (up and down on a cylindrical handle).
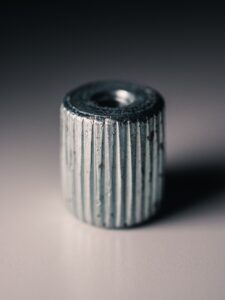

Diagonal/annular knurling
Diagonal or annular knurling runs lines in a single direction at a specified angle. Instead of up and down, all the lines might run at a 30° from the axis location, but all the knurled lines are still parallel to one another.
Diamond knurling
Diamond knurling uses two different sets of diagonal lines that intersect to create a crisscross pattern. This is probably the most common form of knurling that you’ll see since the texture provides grip in multiple different directions, whereas straight and diagonal knurling are more one-directional.
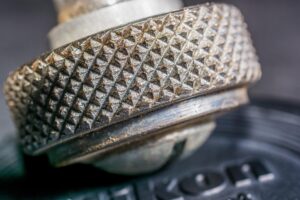

Knurling Methods
Creating a knurl comes to two different methods: using a machine, or doing it by hand.
- Machine knurling involves using a lathe for cylindrical parts, or CNC milling machines for flat parts (which is a lot less common). It’s a more repeatable and consistent option that can be done with the same parameters across the whole production run.
- Hand knurling uses a manually-operated tool that either presses against the cylindrical part or rolls against it. It works fine for one-off jobs, but it typically isn’t the economical option for larger production runs.
Benefits of Knurling in Manufacturing
Why would you add a knurl to your part in the first place? A simple knurl can solve a lot of practical problems for end users:
- Grip improvement. Smooth metal can be hard to hold, especially for smaller parts or when the user has wet or oily hands. Adding a knurl automatically adds a texture that gives a more secure grip that can make the part easier to use.
- Torque control. When parts need to be manually rotated, extra grip allows the user to apply more torque, and be more consistent with how the part is rotated. This is why so many hand-tightened fasteners have knurled surfaces.
- User interaction. A knurled part can give more tactile feedback, making a part easier to identify and control even when the user isn’t looking at the part.
- Press-fit preparation. Knurling can also help provide more mechanical retention between press-fit parts. This can be useful when your assembly requires parts to remain securely positioned together.
- Decorative finishing. Other applications might use knurling to add a more decorative and sophisticated finish, since knurling is a deliberate design feature that often looks better than a smooth face.
- Branded surface treatment. Other times, people will add knurling for customer-facing products since the finish is consistent and more recognizable, typically helping the part look higher-quality.
Want more design tips?
Grab our free CNC Machining Guide to learn how to avoid common pitfalls and optimize your design.
Design and Drawing Considerations
For designers and engineers, there are some considerations when it comes to the design of your part and what information is provided in the manufacturing drawings:
- Knurl type. At a minimum, you would need to decide if you want to use a straight, diagonal, diamond, or custom knurl type.
- Knurl pitch. The pitch of your knurl determines how coarse or fine the resulting pattern will be. A coarse pitch has larger, more prominent features, while fine patterns are smaller and more closely spaced.
- Knurl location. Your drawing will need to clearly show where the knurl needs to appear. The location will tell the machine shop where specifically to add the knurl, ensuring it’s applied in the correct place.
- Knurl length. The knurl length establishes a stop point for the knurling operation. The length is a by-product of the ergonomics, appearance, or mating geometry of your project.
- Pre-knurl diameter. A pre-knurl diameter is necessary to ensure we manufacture the part correctly before adding the knurl. Knurling can change the maximum diameter of a part, since material can be displaced and create ridges.
- Post-knurl requirements. Some applications require a specific part OD, so we would need to machine the part after applying a knurl to ensure its consistency.
- Minimum finished diameter. For parts that are fit-sensitive, you might also provide a minimum finished diameter to ensure the parts will go together.
Materials and Process Limits
Knurling can be done on a lot of different materials, and it doesn’t have an effect on the material properties, so it won’t make your parts stronger or more durable.
It can be added to common machinable metals like aluminum, stainless steel, brass, steel, and some harder plastics.
Keep in mind, thin walls, brittle materials, and tight fit areas are all more difficult to add a knurl to. So, these areas will either be more expensive, or impossible in certain scenarios. In other cases, adding a knurl to precision mating areas could damage the functionality of your parts. You can always reach out to our experts for a consultation on how feasible it is to add a knurl to your parts.
Surface Finish Considerations
Adding a knurl doesn’t necessarily mean you have to give up your preferred surface finish. A lot of finishing operations can be done on a knurled part with no problems.
- Anodized aluminum parts preserve the knurled texture and add corrosion resistance and surface durability.
- Bead blasting can create a more uniform, matte appearance to your parts. We just have to make sure we don’t overdo it with the bead blasting, which could dull the texture of the knurl.
- Plating adds wear resistance, corrosion protection, or a particular cosmetic appearance to parts with a knurl on it.
- Passivation is commonly done on stainless steel parts to help with corrosion resistance by adding a thin layer that can still retain the underlying knurled geometry.
- Chromate conversion can be added to aluminum parts to give corrosion protection and maintain electrical characteristics of parts without removing a knurl.
Applications of Knurling
We’ve added knurls to countless parts over our decades in business. Across industries and applications, there are a few common uses of knurling:
- Knobs. A knurl on the outside diameter of a knob gives more traction and allows users to make minor adjustments more easily.
- Handles. A knurl on a metal handle can add texture without requiring a separate rubber grip.
- Tool grips. Knurls on a tool grip are often more reliable and longer-lasting than rubber or plastic grips that can quickly wear out.
- Fasteners. Manually-operated fasteners will use knurls to give users more grip without requiring a wrench or screwdriver.
- Thumbwheels. Thumbwheels are designed for manual rotation, so a knurled surface is almost the default setting.
- Medical instruments. For precise manual interaction, designers will add knurls to medical instruments.
- Industrial controls. Industrial controls often have knurls on their switches, dials, knobs, and adjustment mechanisms for grip in the aerospace, industrial, automotive, robotics, and heavy equipment industries.
Precautions When Knurling
Just because knurling has been used for centuries doesn’t mean it’s a foolproof process. A machine shop needs to use tooling that is in great operational condition, they need to be very careful with the applied pressures, and they need to watch out for excessive machine wear over a long-term operation. Missing the mark in any of these categories will leave you with a subpar knurl that doesn’t provide all the benefits of a true knurled part.
Additional quality assurance and tooling inspections are mandatory to ensure the knurl is reliable and consistent across hundreds or thousands of parts.
Why Choose Rapid Axis for Knurling?
Many people choose Rapid Axis because we have the machining expertise your project needs. Our team is always here to answer your questions, and our full-service machine shop can handle all of your needs from prototype to full-scale production. We take a lot of pride in our work, and our goal is to deliver perfect knurled parts the first time, instead of wasting your time on parts that don’t meet your quality standards.
We have created knurled parts for aerospace, automotive, medical device, heavy equipment, and robotics companies across applications. Rapid Axis is the precise, practical, and easy way to get high-quality parts delivered within your timeline.
Why Knurling Is Worth Getting Right
Knurling might seem like a simple machining feature, but there is a lot of machining expertise required to deliver a tool with better grip, better control, better fit, and better manual torque transfer. At Rapid Axis, our expert machinists can create precision components within your design specs, and our team is easy to contact, so you can rest easy when you have Rapid Axis in your corner. Get a free quote today to get started.
